Welcome

Welcome to my wargaming blog,
I'm Dave and live in Morpeth, Northumberland in the UK.
This may or may not be a regular thing, we'll just have to see how it goes.

I am a painter/collector of figures first and a wargamer second. My thrill in this great hobby of ours is to place that final well researched & painted unit into the cabinet. The actual gaming with the figures is an important but secondary experience, we all like to win, but it isn't the be all and end all of it, being with good friends and having fun is.
Hope you will enjoy reading this blog as much as I will writing in it.
Just to remind the visitor to scroll down the various pages and click on 'older posts' to see more.
Dave.

Thursday 14 November 2013

Battle of the Denmark Straights, May 1941.

This will be the last game played in my garage till the weather starts to warm up again next year and as it was a one night stand as it were I thought the lads (Scotty and Neal) would like to have a go at something a little different. It has been at least a year since I gamed with my WW2 1,2400 GHQ ships so I went for that. The scenario was the battle of the Denmark Straights in May 1941, pitting the German battleship Bismarck and Heavy cruiser Prince Eugen against the British battlecruiser Hood and battleship Prince of Wales.
The tale is pretty well known with the two German ships looking to break out into the Atlantic to raid/disrupt British convoys while the British fleet attempted to intercept them:


The engagement took place with the Hood being sunk after a shell from the Bismarck igniting the Hood's magazine and the Prince of Wales withdrawing under heavy and accurate fire from the two German ships.
I umpired with Scotty taking the British and Neal taking the Germans. We used the Naval Thunder (Battleship Row) rules by Steel Dreadnought Games Here not overly complex but not ridiculously simple either.


The info tables for each ship:


All pretty straight forward when you get used to them and a good set of rules.

The object for the Germans was to sink one British ship then exit the end of the table with both their ships pretty much intact. The Brits had to sink the Bismark.
Naval games never really look that pretty so don't expect any flash photographs!

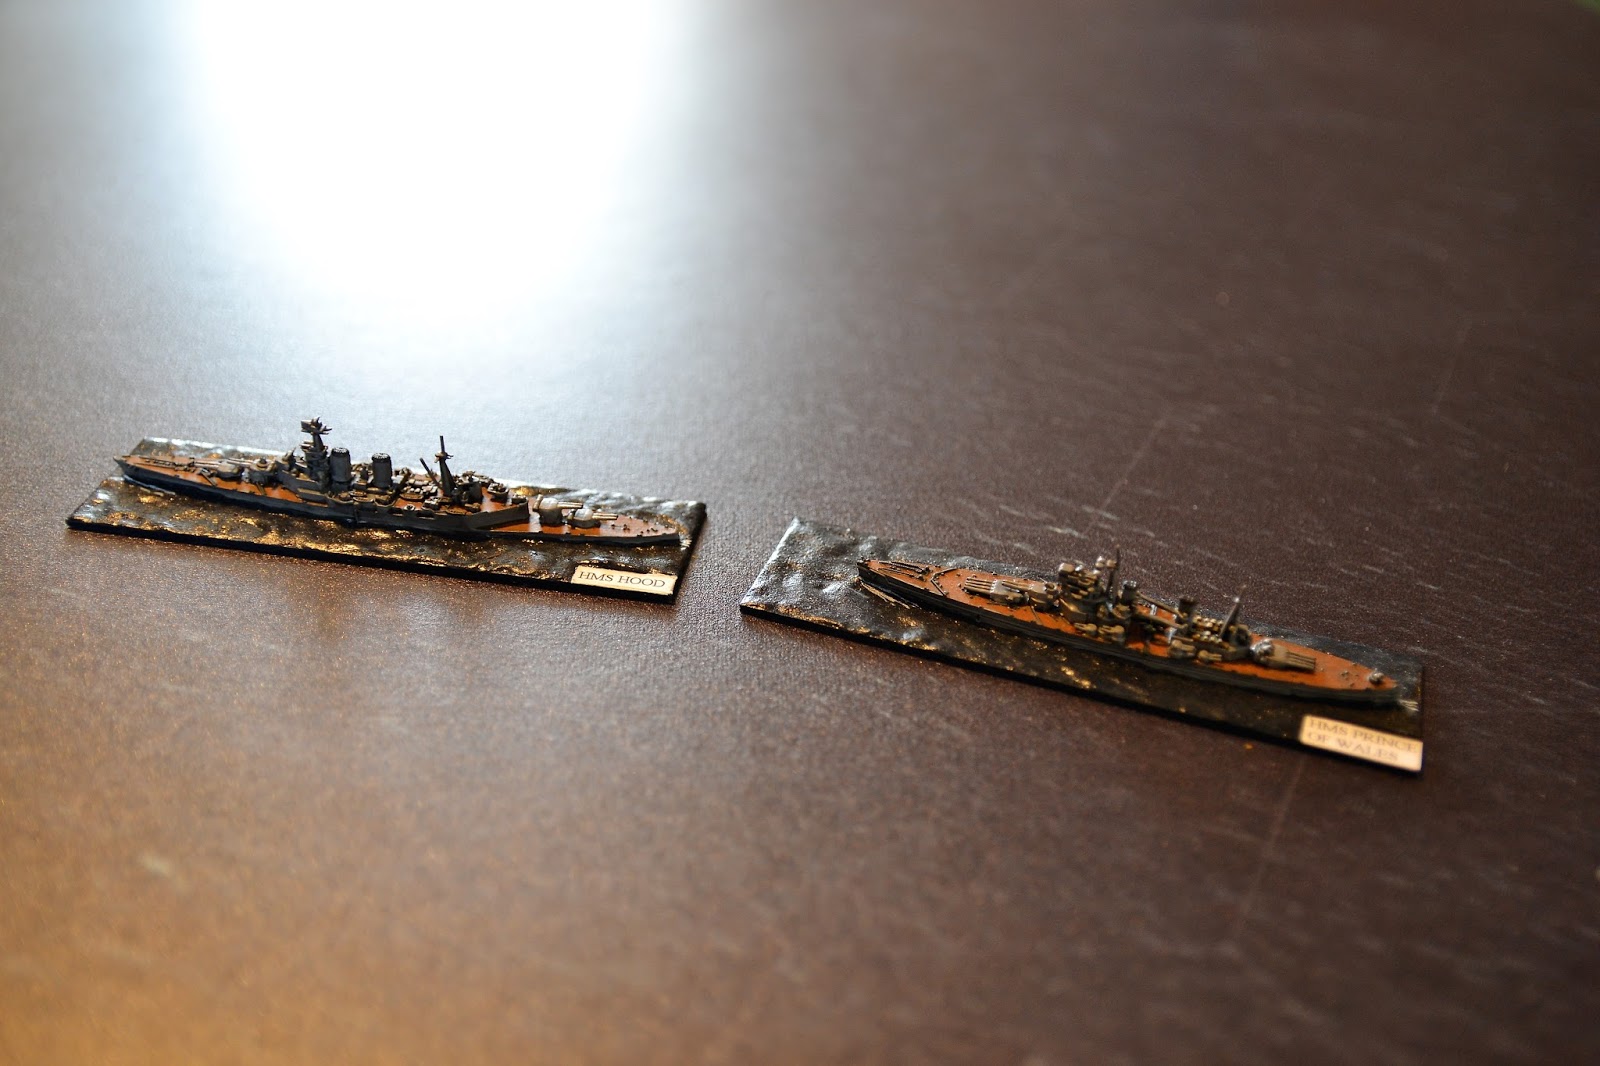
Set up, Germans at the right, British left:


Hood & Prince of Wales:


Bismarck & Prince Eugen:


The markers denote how many ships are firing at a particular target:


The action continued with the Hood taking a particular pounding while attempting to close the range, the Hoods weakness in gunnery and the Prince of Wales mechanical problems gave the German ships an advantage at this point.
As the fleets closed the range the Bismarck which up to this point had been firing well went two turns without hitting a thing while the Prince of Wales opened up and (Scotty) threw three 10's on a D10 in one go!
This knocked out the two forward turrets and damaged the engine of the Bismark, while it's secondary armament raked the Prince Eugen. A somewhat disgruntled German admiral (Neal) decided discretion was the better part of valor and limped off under cover of smoke.

The tail end of the battle, Hood (left) is on fire and the Bismarck (bottom right) takes heavy damage from the Prince of Wales:


A particular moment of, well if not hilarity, then at least childish giggles was when Scotty, looking at his Fire control chart stated that he did not have any STD (standard fire control) that turn. Both Neal and I thought that his wife would be very pleased to hear it! Goes to show how seriously we take it all.
Dave.

Sunday 10 November 2013

15mm battle of Durot 1809

Over the past few weeks Neal, Scotty and I have been playing out a 15mm Napoleonic game in my garage. As the temperature is rapidly falling and there is little heating in there then this may be the last game this year before we go into winter quarters, but it has to be said that it was a quite memorable one to end the campaigning season with.
The general idea was that the French rearguard (Scotty) were to defend the village of Durot and surrounding area while Neal with the Austrians were to force the French out and put pressure on the French lines of communication during their successful advance along the Danube. I was umpire.
Forced were about two large infantry divisions and one cavalry division each, while the rules used were (as usual) General De Brigade.

The gaming table with the village of Durot in the centre:


The Austrians will enter to the left table edge with the French right centre:


The Austrian cavalry on their right:


The French cavalry opposite:


I must admit I do love watching a good cavalry scrap though I have to say the two lads were a bit reluctant to get stuck in:


The Austrian advance guard flanking force arrives on the French right:


A general view of the French position (the cavalry are bottom right off screen). I thought Scotty would push forward and occupy the fields to his front, this would give him depth and more room to maneuver, he decided to keep thing tight and would come to regret this decision!


Two brigades of Austrian infantry arrive:


Meanwhile a general cavalry melee develops with the Austrians coming off slightly worse, this was followed by the crappiest moral throws ever from Neal which resulted in the Austrian cavalry streaming from the field. The man was not happy:


At the same time the Austrian infantry pour across the fields towards the French center:


Austrian reinforcements arrive to plug the space were their cavalry should have been with French counterparts on the opposite side of the table:


Back in the centre after a heavy musketry duel the Austrian mass infantry columns crash into the French line causing moral tests all round:


A general view of the field:


 After forcing the Hessians from the woods next to Durot the Austrian artillery do great damage to the French in the village:


 Brunswick hussars crash into a French infantry battalion which failed to form square in time(the white counter denotes the fact that the unit fired last turn thereby incurring a minus 2 penalty for firing again. In General De Brigade if you fail to stop the cavalry charge and don't form line your screwed!


Many French units routed or dispersed at this point, the pressure from the Austrians was simply too much and withdrawal was the order of the day as can be seen from the huge hole in the French defences in this picture:


With fingers (and other extremities) getting colder by the minute we all decided that enough was enough, the Austrians had broken through, the French would withdraw what they could and would cover the retreat with their victorious cavalry division.
Great game enjoyed by all.
Another write up can be found on Scotty's site here
Dave.

Monday 4 November 2013

'A skirmish we will go'

As promised some pictures of the newly painted 28mm skirmishers for the Middle Guard Grenadiers and Chassures. This will bring them up to 40 figures in five company's as they were between 1808-12.
I based them on stands of four figures each instead of two to a stand as I can't be bothered with fiddling on with small bases of figures. Here they are:


All done for now.
Dave.

Saturday 2 November 2013

What am I doing!

What did I say, WHAT DID I SAY. I'll be disciplined, I won't start another new period. Well we've all been there.
http://www.forgedinbattle.com/ blame these buggers.
I haven't collected any WW2 stuff for at least 20 years, never really rocked my boat to be honest. The only bits that stirred a bit of interest was 1940-41 desert and early 1939-40 Poland and France. In the latter case it was because my father who manned a Vickers heavy machine gun section in the Northumberland Fusiliers was captured in St Vallery and spent the next four and a bit years in a POW camp in Poland before legging it to the Russian side. He always said he was more wary of the Russians than the Germans who were complete barbaric maniacs till you got to know them!
Anyhow, as Scotty, Neal and I had played a game using the  Bolt Action rules from Warlord Games, as the lads were fielding 15mm Germans and British I went for the French.
Just got round to painting them last week with the addition of two Char de cavalerie 35H tanks they make a good starting point:


I'll post some more 28mm Napoleonic's that I did last week tomorrow.
Dave.

Monday 7 October 2013

15mm 1st Bull Run

After one week of Health and Safety training (such fun!) I though as I'd finished these lads that I had better make the effort and get some pictures on the blog.

The idea for this was the fact that a good friend at the club (Tom you know who you are) gave me some file boxes pretty full with old 15mm ACW figures (mainly Minifigs) knowing I had done a small number for one of the occasional large games up at Micks. Looking at the figures there were and the fact that some of them had the early uniforms decided me on the fact that1st Bull Run using Fire and Fury was the one to go for.

I got the OOB and scenario details from Andy Clark's, site here

Orders of Battle

Union Army
Major - General   I. McDowell  (Corps commander)

1st Division      Brig.-Gen. D.Tyler
1st Brig.(Keyes)  9/8/5
2ndBrig.(Schenck)      9/8/5           Carlisle`s battery
3rdBrig.(Sherman)     17/14/10 E Ayres`  battery 

2nd Division     Col.  D.Hunter
1st Brig. (Porter)      16/13/9         Griffin`s battery
2nd Brig.(Burnside)    12/10/7         Rhode Island battery
Palmer`s Cavalry        2/-/-

3rd Division     Col.  S.P.Heintzelman 
1st Brig. (Franklin)     11/9/6         Rickett`s battery
2nd Brig.(Willcox)       11/9/6                 
3rd Brig. (Howard)  14/12/8

Confederate
Army of the Potomac      Brig.-Gen. P.G.T.
Beauregard (Corps commander)

1st Brig.(Bonham)      17/14/10
5th Brig.(Cocke)        6/13/9
6th Brig.(Early)        13/11/8
Evan`s Brig.(Evans)    6/5/3    
Hampton`s Legion       3/2/-   E
Kemper`s battery


Army of the Shenandoah   Brig.-Gen. J.E. Johnston
(Division commander)

1st Brig.(Jackson)   14/11/7 E Pendleton`s battery
2ndBrig.(Bartow)     5/4/3
3rd Brig.(Bee)       11/9/6          Imboden`s  battery
4th Brig.(Smith)     8/7/5
Stuart`s Cavalry     2/-/-   E 
 
Given that the number of figures wasn't vast I thought this was doable.
So to the pictures of the figures, bare in mind that a small number of the 
figures were done for the earlier project so you may have seen the artillery 
before.
 
 Confederates first, Beauregard's Army of the Potomac in the front,
Johnston's Army of the Shenendoah to the rear:
 

 Brig Gen Beauregard:


There was a huge difference in the size of the brigades on both sides,
anyone with knowledge of Fire and Fury will see that some of these are 
massive:


McDowell's Union Army.
Tyler's 1st Div (rear left), Hunter's 2nd Div (rear right) and
Heintzelman's 3rd Div to the front:


Major Gen McDowell:


Hunter's Div:


Tyler's Div:


Two pictures of the earlier uniform type:


Next step, contact Mic, Neal and Scotty to arrange a game up at his
place, won't be massive but should be fun. I will post the results as
and when.
Dave.