Welcome

Welcome to my wargaming blog,
I'm Dave and live in Morpeth, Northumberland in the UK.
This may or may not be a regular thing, we'll just have to see how it goes.

I am a painter/collector of figures first and a wargamer second. My thrill in this great hobby of ours is to place that final well researched & painted unit into the cabinet. The actual gaming with the figures is an important but secondary experience, we all like to win, but it isn't the be all and end all of it, being with good friends and having fun is.
Hope you will enjoy reading this blog as much as I will writing in it.
Just to remind the visitor to scroll down the various pages and click on 'older posts' to see more.
Dave.

Tuesday 26 December 2017

28mm 7th Century Northumbrian

More re basing done, this time a small force of Northumbrians (had to be didn't it) from around about the 7th century. I got these lads form another fellow already painted to a fashion, not a great fashion it has to be said but a fashion non the less! so with a bit tarting up and re basing I think they will do, at a stretch to oppose the late Romans that I posted last time.
Now I know there will be some guys out there who will say Ohhh noooo the original Saxons didn't look like that, smaller shields etc. I know, your right but when I read though the Warlord chronicles that's how I pictured the Saxons, of course when I then read the later Saxon stories series that's how I pictured the Northumbrians as well - Doh!
What the heck they are how they are, I don't care and I don't care if anyone else cares, here's the pictures:


Now it has to be said that I did not re base these during Christmas,
1. I'm not that sad.
2 My wife would have killed me!
Have a great whatever is left of your Christmas break dear reader and a most peaceful New Year.
Bugger, noticed that the command stands haven't got their die holders on, I ran out so I'm off to do that now, Bye.
Dave.

Monday 18 December 2017

28mm Sub Roman Briton/Arthurian

A short post to show the re basing of my Sub Roman/Arthurian type figures. As usual they are for our go to rules 'To the Strongest' bases on Impetus bases cause I like the look!


As usual I did tart them up a bit but no substantial re painting really.
Dave.

Tuesday 12 December 2017

Blucher rules

Having bought Sam Mustafa's Blucher rules almost one year ago Neal and I finally got round to giving them a try a couple of weeks ago. Now I have played a game at the club once before and though it was ok there was something missing.
The game at the club was played with 10mm figures on a very small table and was to be fair the only way the guy who brought them to the club could game in his house because of limited space, good for the lad, he has utilised a set of rules to enable him to game a limited engagement on a 3' by 3' table ending up fighting a head to head battle between in Blucher terms a Division per side. Don't get me wrong, one does what one can with the resources available but it didn't feel right.
There was no grand majestic sweep and manoeuvre of troops that I was looking for in this level of encounter. I wanted a corps level re fight of, if I wished the battle of Borodino with units representing either brigades or divisions, not battalions, unlike a brigade/Division level encounter that can be re fought in say General d'Armee rules.
10mm figures were used at the club game, but one group of figures just didn't give the impression of a brigade or division, it looked like a battalion, you could tell yourself it was a brigade but it just didn't 'feel' right. Again the mechanics of the rules themselves played out ok but there was something missing.
So with that experience under the old belt what now. I still wanted to game a corp level game but didn't want to use maps and counters, each to their own but that don't rock my boat. Hence as has been shown in previous posts Here a decision to go with one base representing a Brigade or Division depending on what scale one is playing, I have made sure that there is more than one 'unit' on each base so that it at least seems to represent a formation rather than an individual battalion or whatever.
The newest additions to the armies can be seen below:


So, slightly disappointed though I was with the Blucher game at the club both Neal and I felt a good bit better about it when we had a go at recreating a Salamanca re fight with each base representing a division. The rules were pretty easy to pick up (though the rule book could do with a better index), the game flowed and 'felt right'. Simultaneously I played out a larger knock together game solo at my place using the unit cards purchased in addition to the rules which enable you to get straight into it without painting figures:


As can be seen the British force got their outnumbered arse kicked, listening Neal!
This isn't a detailed set of rules, subtle but not detailed. You do get the feel that you are manoeuvring with corps, battering the weak point in the enemy's line with your mass artillery and exploiting the gap thus created with your heavy cavalry reserve, sixes hit, fives if you have an additional trait but it does somehow all add up with the feeling your fighting a battle, not an encounter.
I still think it will feel better when I eventually get enough figures done to put them on the table rather than the cards you see above (it's not aesthetically pleasing I have to admit) with maybe a bit more terrain, unnecessary in the rules but visually better.
With a table of the size I have to play on this would be the only set of rules that I have personally encountered which would me to re fight large battles and I'm prepared to make compromises to allow me to do that, add to that the Scharnhorst campaign rules in the book which I have yet to try out and I think we're onto a winner.
Dave.

Sunday 12 November 2017

Up yours Photobucket!

As the title suggests and as stated in previous posts, due to Photobucket's brilliant business decision to charge bloggers money for republishing/posting or whatever you want to call it on third party sites I have for quite a while been busy re-posting all of the photographs which I had stored on my hard drive back onto this blog cause I won't bow to blackmail.
I know, it's their site where I put the pictures, it's their decision to charge and ultimately I should have just posted them onto the blog direct from my hard drive and saved a lot of work but I didn't, mainly as I didn't see this coming but what the hey.
Anyhow all pictures have now been re-posted and if you dear reader wish to peruse all the older posts by clicking on the headings under the large title picture of Napoleon on the front page then they now all have pretty pictures to go with them. Jolly good and as the title says, 'Up yours Photobucket'.
Dave.

Sunday 5 November 2017

General D'Armee - Santa Lucia 1812

I am in the very fortunate position of having a wargame room all to myself, the main advantage of this (other than for my wife who gets rid of me up there) is that Neal and I can play through a game at our own leisure, taking our time and avoiding the wargamers curse of 'hey it's the last 1/2 hour lets throw everything in' syndrome.
So with that in mind we decided on having a typical peninsular war corps level game using the fantastic General D'Armee rules by David Brown. This took place over a four week period (we can only manage to get together for about two hours per week) and both of us made a point of following the tactics employed by both protagonists as we understand them and thereby testing the authenticity of the rules fully.
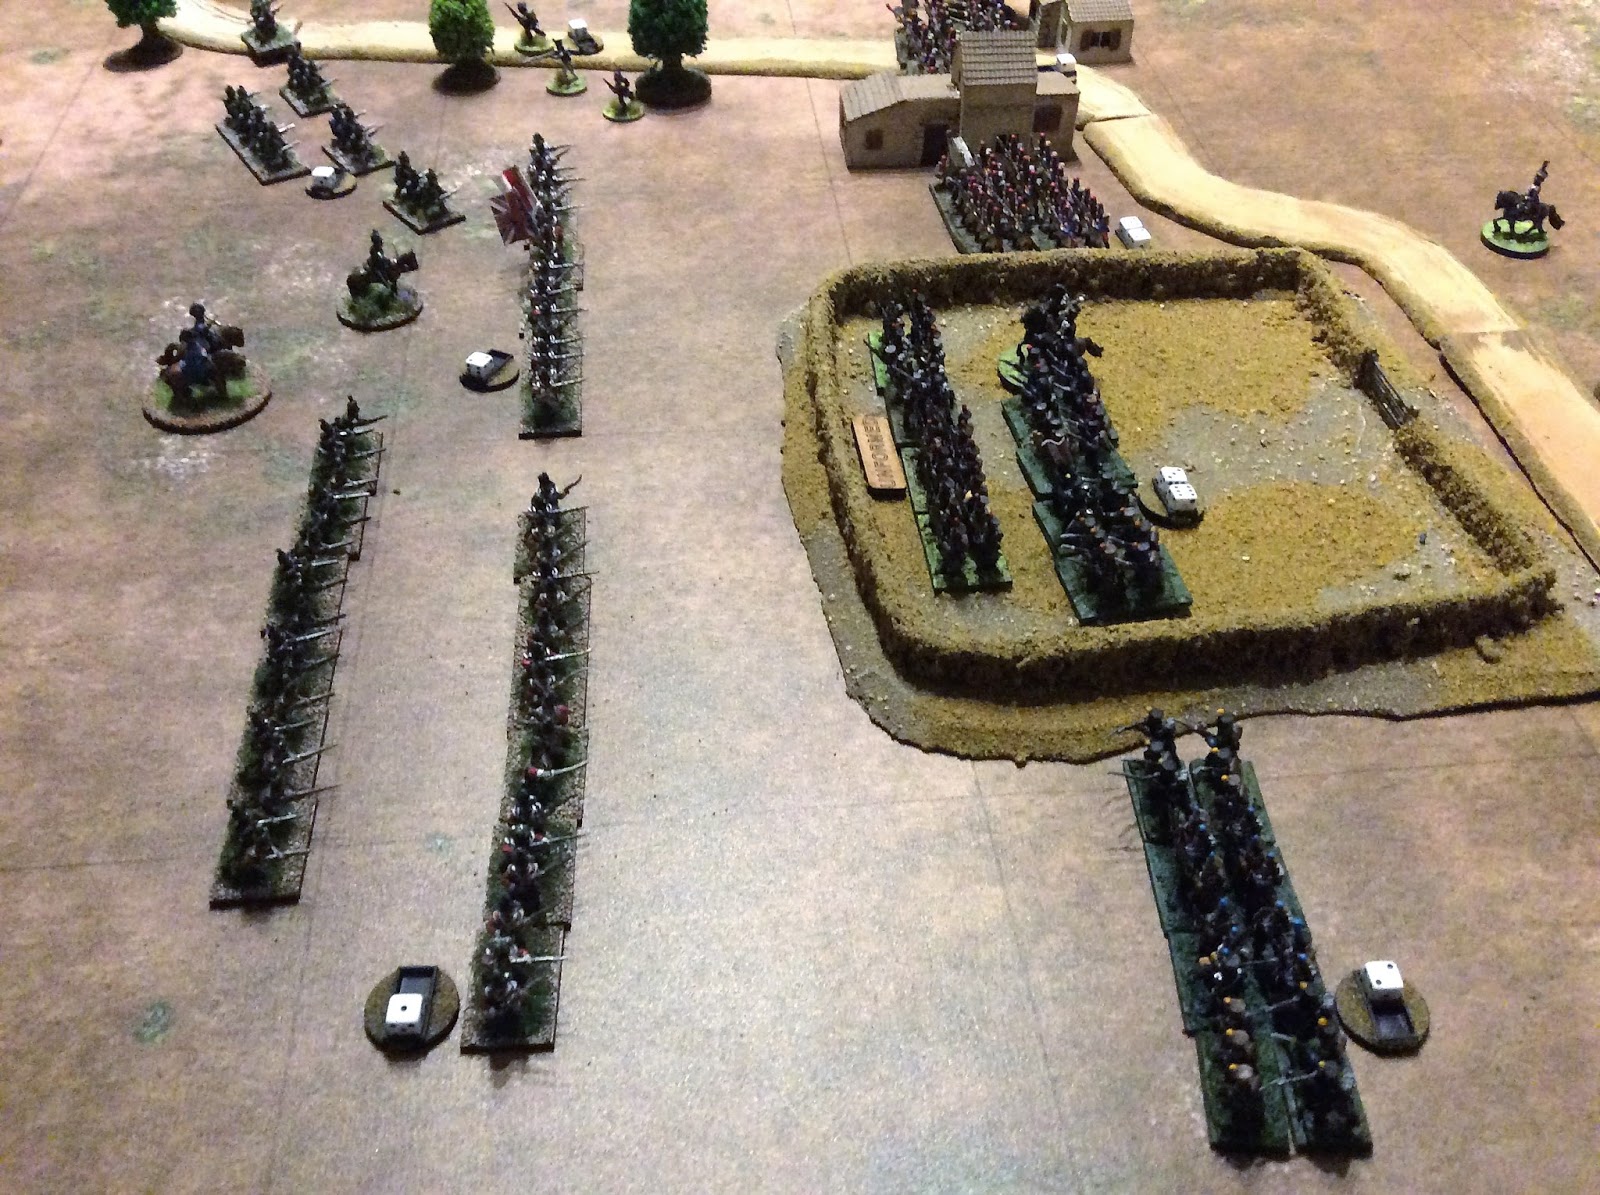
As can be seen below the British commanded by Neal set up with the Light Division (2 brigades, four battalions in each) at the bottom of the picture below the road with the first brigade occupying the village and field and the second in reserve.
A second Division can be seen just behind the crest of the ridge with it's 2nd brigade again in reserve behind and a cavalry division to the top of the picture guarding the left flank of the corps.


 Light Division's 1st brigade, 95th in the village with artillery support:


Second Division's 1st Brigade just behind the crest of the ridge with composite light battalions and artillery to the front:


The British cavalry Division, British Dragoons to the front and Spanish in the second line faced by their French counterparts:


Looking again at the top photo the reader will see the French with one infantry Division opposite each of the two British, the artillery combined into a two battery brigade in the centre cavalry on their right wing and one veteran Brigade off table in reserve.
Neal's plan, I suspect was to cling to the ridge like a limpet while protecting both his flanks. Mine as the French had to be to distract the strong British Light Division on my left with a limited attack, clear the British artillery and skirmishers from my front, weaken his centre and punch through. There only British after all!

The diversionary attack on the British right went in with the French driving the Portuguese and 95th light infantry out of their positions forcing the British artillery away and occupying the village on that flank, so far so good but the French Division had suffered heavy casualties in doing so.


As the French cavalry moved forward to confront their British opponents they noticed that a British light infantry battalion had strayed too far forward in an attempt to engage the advancing French artillery. The sudden charge caught the lights at the end of their evade move and destroyed them completely. The end of the charge:


No photo of this but revenge was sweet for Neal as with two very good throws of the dice one French battalion retreated off the table hit by artillery while the lancers supports were hit by the artillery battery above.

The rest of the cavalry of both sides clashed after the British dragoons moved forward allowing the French light cavalry to charge, normally I wouldn't of touched British heavies with a barge pole but I had one extra brigade in reserve and boy did it pay off. Neal threw the crappiest dice ever and off went the dragoons first in retreat then with a terrible Brigade Falter roll they dispersed. Oh dear, how sad, never mind! On into the Spanish went the French.


With the allied cavalry dispersed or pinned back some of the French cavalry could now threaten the British infantry in the centre.


Meanwhile on the British right the diversionary attach against the Light Division was grinding to a halt, the French were simply being thrashed by British volley fire. The casualties were mounting and things were looking decidedly dodgy!


In the centre the French reserve Brigade of veteran light infantry advanced to the right hand end of the British held ridge, their cavalry had driven off their opposing counterparts and the time had now come to push round the flank.
Neal however had other plans, the cleaver sod having won the initiative before I was within charge distance swung his two small British battalions to face the oncoming French and poured in a devastating volley stopping the French in their tracks.


My only compensation was that a British battalion on the extreme left of his line was caught in square when hit by a French column and retreated ready to be eaten up by the victorious French cavalry.


As can be seen above the time was right for the exposed two battalions to be crushed and more importantly the retreating British battalion to the left of the picture to be charged by the French lancers who would then cut through the Portuguese reserve brigade coming up to shore up the flank.
In the command phase the lancer brigade commander was allocated a 'Glory' marker and a re-roll marker, great, roll a 3,4,5 or 6 and off they go into the infantry. Roll a 2, no matter they have the re-roll, well dear reader you just know what's coming, yep another sodding 2. Hesitant - no charge and Neal pissing himself.
The infantry attack still went in and routed the British brigade but those dam Portugese were still there.


Back on the British left the Light Brigade was very close to breaking their French opponents and hadn't even committed their reserve brigade, the photo below shows casualties at nines and tens with twelve their dispersal value, not good.


The end was nigh for the French, their right crumbling, their right stalled, it had to be the centre. The British had done what the had successfully done throughout the campaign and sat behind the ridge. Though my artillery had performed particularly badly the simply hadn't been able to touch the main British line while both sides skirmishers had nullified each other. Therefore my central French infantry attack had to go in to a fairly fresh British main line of battle. The result was predictable:


The game was reviewed at this point. A strong French push to uncover the British position had been comfortably repulsed at heavy cost to the French though the British force would be unable to exploit the situation without it's cavalry. The British could either hold the position and await reinforcements or withdraw behind the Light division rearguard. The French must withdraw to lick their wounds.


A great game, Neal said it was the most realistic portrayal of the period that he had played so that's something cause goodness knows we have tried every set of rules going to get it to feel right.
Good stuff. See ya,
Dave.