Welcome

Welcome to my wargaming blog,
I'm Dave and live in Morpeth, Northumberland in the UK.
This may or may not be a regular thing, we'll just have to see how it goes.

I am a painter/collector of figures first and a wargamer second. My thrill in this great hobby of ours is to place that final well researched & painted unit into the cabinet. The actual gaming with the figures is an important but secondary experience, we all like to win, but it isn't the be all and end all of it, being with good friends and having fun is.
Hope you will enjoy reading this blog as much as I will writing in it.
Just to remind the visitor to scroll down the various pages and click on 'older posts' to see more.
Dave.

Friday 28 April 2017

Caesar Vs Pompey, Battle of Narbo 49BC.

As Caesar and Mark Anthony were forcing Pompey out of Rome three raw Pompeian legions (2nd, 6th and 4th plus some cavalry) marched north between the Mediterranean coast and the Pyrenees on the city of Narbo (Narbonne), a bold move as it was held by a strong force of five Caesarian legions 7th, 9th 10th 11th and 14th, all experienced troops. I had made a point of not examining the Caesarian blocks on the game board prior to moving the Pompeian forces so was unaware of their composition.


The Pompeian forces did however have quite literally a card up their sleeve, played as their movement card it allowed 'Move one group, all attacking blocks fire before all defending blocks in any one battle, one round only'. Now if you recall one round in the battles fought in the boardgame equates to three turns or 1/4 of the twelve turn battle being fought on the table top.
So the question was how do I represent this advantage for the Pompeian force for these first three turns using the To the Strongest rules?
I decided that the Caesarian army would deploy first, particularly as they had no cavalry and were therefore out scouted. The Pompeian force could start the battle three full hexes in from their side of the table, they would get the first move free with no Caesarian reply and that the Pompeian force would for the first three turns only be graded on step higher than they actually were. So in this instance they were all raw but for the first three turns would fight as average troops and revert to raw on turn four.


The forces involved.


 Neal came over and decided to take command of the Pompeian forces which set up as above, each side had two attached generals but notably no detached commander figure as no named commander was included in the forces on the campaign board. This was quite interesting as it limited the command distances on the tabletop considerably making each of us attempt to keep our forces concentrated.
As can be seen, the Pompeian force weighted it's right and pressed forward immediately attempting to take advantage of  it's heightened moral for the first quarter of the battle.


The white shielded Pompeian legions move quickly forward.


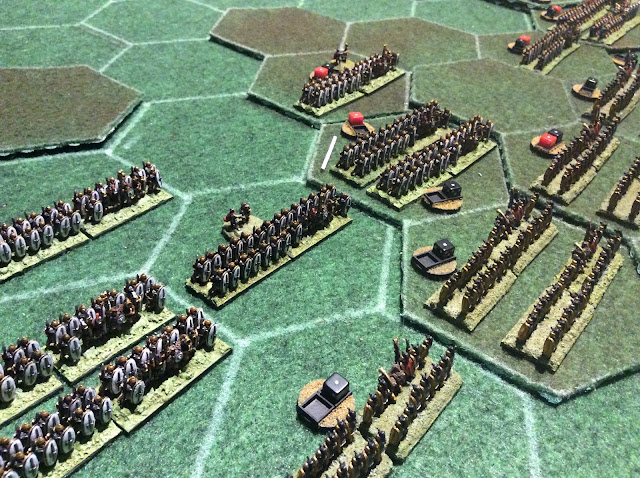
Both forces push forward with their right wings. As usual the black die show that the units have thrown their pilum while the red die mark units disrupted, two of those and the unit is destroyed forcing a moral test on all surrounding units.


 Pompeian forces on the right of the picture and Caesarian on the left. Note how outnumbered the Pompeian legions are, three to five, can they punch through the experienced Caesarian troops before the Pompeian cavalry on their left give way?


Units were beginning to give way but more on the Caesarian side, incredibly the inspired Pompeian troops were grinding their way through their opposite numbers, a grisly business! There weren't many token counters left in the Pompeian camp.


As the Caesarian commander I now had my chance to save this disaster, hit the centre in their flank and force Neal's cavalry off the field. Would the cards help me out - would they bollocks, attacks went in, attacks were repulsed, it must be a cards thing but we both swear like troopers when we play these rules, great stuff!


The end came when a couple of my Caesarian legionary units fled from the field and my last coin tokens went into the cup. A great game and a hard fought battle with credit going to Neal for forcing his troops forward utilising his temporary moral advantage and surprise advance. All of his legionary units were raw compared to the majority of mine which were average and veteran, a famous and unexpected victory to Caesar.


The disparity of casualties can be seen above, Caesarian top, Pompeian below, note that the marker blocks have been adjusted to show the strength point losses incurred because of the battle.


The situation on the map after the battle. The winning Pompeian force has occupied Narbo while the Caesarian forces have divided, two legions going to Burdigala (Bordeaux) and three to Massilia (Marseilles). The green block at the bottom of the picture should be in Tarraco.
Next will be a fighting retreat from Napolis by Pompey himself.
See you soon,
Dave.

Sunday 16 April 2017

Caesar Vs Pompey campaign.The first battle of Rome 49BC.

In the summer of 49BC Pompey with two legions plus supports moved from Naples to occupy Rome.
Mark Anthony advanced from Genoa with the 8th and 12th legions with Caesar coming from the north in support with the 13th. The first battle of the campaign was about to begin.
As stated previously one strength point on each block will be represented by one unit on the table. Cavalry strength points equate to cavalry units, auxiliary strength points equate to skirmish/missile troops but the strength points of general markers in the campaign can be chosen from legionary. cavalry or skirmishers. This gives a bit of flexibility to the choice if a general is present.
The game will be played using the excellent To the Strongest rules but using my hex mat. The hexes allow units to manoeuvre slightly more than the rules intended as they were designed to be used with a grid system but it is what it is!


The blocks above will participate in this battle, Pompey in green plus the cavalry he bribed to come over to his side this turn. Mark Anthony below and Caesars reinforcements. The game will be twelve turns and Caesar will be allowed to come on the table from the north on game turn three.


The terrain is randomly decided, Pompey is at the top of the picture, Mark Anthony at the bottom while Caesar will wait till turn three to appear from the north (left).


Pompey's force, six average legionary units, four raw legionary units, three cavalry and one skirmish. Two attached generals and Pompey himself senior/detached leader.


Mark Anthony's force, six average legionary units, two cavalry and three skirmish units. Two attached leaders and Mark Anthony senior/detached.


Caesar, five average legionary units, one cavalry and the man himself an senior/brilliant/detached leader. This force will arrive GT three.


Pompey decided that a quick victory was essential as he was aware that Caesar was advancing quickly to support Mark Anthony. Pompey pushed his cavalry to the flank to slow Caesar when he arrived while his centre attacked Anthony's position in a somewhat piecemeal fashion.


Occupying the higher ground Anthony's forces were inflicting heavy casualties on Pompey's legionaries with one unit routing already. Fortunately the rout did not spread to units on either side of the gap.
Black die donate units which have thrown their pilum while the red die show damage, a legionary unit will be destroyed if it suffers two of these while a cavalry or skirmisher will go on one damage. Units can recover these but will be better off attempting to do so from a position where they cannot be charged, hence the legionary unit in the bottom right of the photo has withdrawn behind it's support to attempt do so.


Pompey is forced to plug the gap in his lines with two of his raw legionary units from his reserve.


Turn three, Caesar appears on Pompey's right flank, with two of his reserve units already committed it doesn't look good. I know, Caesars units should be orientated so that they face the point of the hex, I changed that later!


A general view of the field on GT four, Caesar had failed to move last turn turning up two aces in a row while the two centres were simply grinding away at each other.


When it goes it goes, three of Pompey's units rout in his centre leaving a gaping hole, is this the end?
Simon has changed the rules slightly so that if a non skirmish unit routs then all units adjacent must test, they have two chances to save themselves. One legionary unit went one the right of Pompey's centre, the skirmisher failed as did the legionary unit. The two yellow shielded ones in the top picture managed to hold though. Not much consolation for Mr P!


That was it though, Pompey had lost all his tokens, you are allocated a number of them according to the size of your force, you loose one for each skirmisher unit destroyed and two for each legionary/cavalry/general. A huge hole had been punched in his centre and the time to get out of Dodge (or Rome in this case) had come.
All destroyed units counted for strength points taken off the campaign counters, Caesar occupied Rome while Pompey's remaining force limped back to Naples.
It will continue.
Dave.

Friday 14 April 2017

Caesar Vs Pompey, To the Strongest campaign. Intro.

This has been a long time coming. I've been wanting to get into a campaign of some sort for as long as I can remember wargaming but really the time, opportunity and enough figures to cover everything myself has never materialised.
I apologise in advance if this particular post is mainly a description of the board game used to facilitate the campaign but I feel it is necessary to set the scene as it were. The next post will cover the first engagement on the tabletop.
My collection of 10mm Caesarian Roman figures has been on the simmer for many years but the final push was always needed. This came in the form of buying the Columbia Games block boardgame Julius Caesar


A highly recommended boardgame based on the Roman civil war 49-45 BC which plays out very well indeed as a two person game by itself. So having completed enough 10mm figures to cover the intended battles - off we go.


The mapboard showing the Med area in 49BC with Caesar's forces (red blocks) and Pompey's forces (green blocks).


This shows the Iberian peninsular, the towns are marked with major roads (thick lines) and minor roads (dotted lines) running between them. Each block represents either a leader, a legion, or an auxiliary unit, with four units (inc a leader) allowed to move along major roads but only two along minor roads.
Forces (groups of units) may either move two cities per turn or attack any enemy occupying the city next to them. Enemy forces may reinforce that turn using the same movement restriction as above.


This shows Caesars central position at the start of the campaign. Rome is unoccupied with Pompey to the south in Neapolis. Normally the blocks are set up facing their owners who sit on opposite sides of the table thereby making them unsure of the composition of their opponents forces. Playing solo I just had to make the most obvious moves for each side, not ideal but needs must.


This picture shows Pompey's reinforcement pool. On the left the blocks with eagles are legionary units, next column are auxiliary units, then cavalry, elephants and ballista units and finally naval fleets.
On each block clockwise - top left, unit designation (i.e. 38th legion), strength ( IV Roman numerals), attacking order/number required to hit on a D6 (C2). A's attack first, then B's C's and so on.
On the board each block is stood upright as seen here but as it takes casualties the block is rotated with the current strength showing on the top of the block as it stands. So when looking at your opponents block you know neither the forces composition or strength.


At the beginning of each year each player is dealt six cards, after discarding one card each that they don't want players play one card per turn and move their forces/fight battles if they occur. After all five cards have been played that is the end of that year. The forces on the board then go into winter quarters with the restrictions that entails and everyone moves into the next year repeating the process.
The game is won when one side has occupied a number of key cities/recruitment centres.
The cards shown above have the number of forces (not units) which are able to be moved that turn on the red standard (so two on the left card) while the rings below the red standard show the number of strength points which may be recruited to their forces after movement (but before battle).


As can be seen above Pompey has moved to occupy Rome and has bribed a force of Caesarian cavalry to come over to his side. Mark Anthony has moved directly south to engage with Caesar himself reinforcing from the north.


The two forces which will engage in the battle of Rome 49 BC. Remember each strength point represents a unit on the table, Caesar will join the battle on game turn three out of twelve.
Next post will cover the battle on the table using Simon's To the Strongest rules. See his blog here
Shouldn't be long before posting, have a good Easter folks,
Dave.

Thursday 6 April 2017

10mm Russian cavalry

I did these a while back for Blucher and forgot to put them on, photos are a bit crap so sorry for that.


Dave.

Sunday 2 April 2017

10mm French Napoleonic

Very quick really, here are the first two French brigades for Blucher:


The magnetic brigade ID strips are still to go on the back of the units in between the die holders but I thought I'd get a few done first. It's a start.
Dave.