Welcome

Welcome to my wargaming blog,
I'm Dave and live in Morpeth, Northumberland in the UK.
This may or may not be a regular thing, we'll just have to see how it goes.

I am a painter/collector of figures first and a wargamer second. My thrill in this great hobby of ours is to place that final well researched & painted unit into the cabinet. The actual gaming with the figures is an important but secondary experience, we all like to win, but it isn't the be all and end all of it, being with good friends and having fun is.
Hope you will enjoy reading this blog as much as I will writing in it.
Just to remind the visitor to scroll down the various pages and click on 'older posts' to see more.
Dave.

Friday 31 July 2015

Southern France 1793

An smallish but enjoyable game at the Border Rievers club, Blagdon Hall, Northumberland, on Wednesday pitted two French Demi Brigades (six battalions), one battery of guns plus numerous skirmishers against four rather large Austrian battalions supported by a battery of 4pdrs.
The French attacked (naturally) after the Austrian commander positioned his troops behind cover as best he could though some units did advance further than intended due to crappy dice rolls, always the way. Rules, General De Brigade.

The large Austrian brigade advances towards it's designated defensive positions:


A view of the field of battle:


One of the French Demi Brigades advance rapidly towards a now exposed Austrian battalion preceded by a swarm of skirmishers:


While the second Demi Brigade elicits a volley from a humongous 48 figure Austrian battalion:


After suffering considerable casualties the first Austrian unit succeeds in driving off the French skirmishers:


With supporting fire from the regular battalion in the centre the two 'Les Blue' battalions charge in column towards the awaiting Austrians. Giving fire the Austrian battalion succeeds in halting the French on their left, however the second French unit crashes into the Austrians driving the unit back but not breaking them:


This was unfortunately the last photograph I had the time to take. Being umpire and given the fact that the rest of the guys weren't familiar with the rules meant that I had to concentrate on the game.
The French attack failed, they simply couldn't manage to get past the volley fire of the huge Austrian battalions. This was in the main due to the usual lack of time on a club night, but also the lads commanding the French should have worn the Austrians down with skirmish fire and manoeuvred their heavier gun battery into position to do some damage, following the tactics of the period.
An excellent game none the less.
Dave.

Saturday 25 July 2015

French Imperial Guard artillery, 1870.

Some pictures of the reciently compleated French Imperial Guard artillery. The photos are pretty crap but I can't seem to edit in Photobucket as I usually do. Frustrating.


On with the corps cavalry next.
Dave.

Sunday 12 July 2015

Sparta Vs Athens 15mm, the game.

Athenian Vs Spartan alliance battle with the Athenians having a few more hoplites but with the Spartans having the edge on quality. The rules as explained in the previous post were 'To the Strongest', 15mm mix of figures on Impetus bases on a hex base table, again explained in the last post.
Movement is card based, four packs are used, two per side. The picture cards are removed and the packs split into red and black. Each side is divided into commands (usually three) with each command completing it's move before moving onto the next command.
Units are activated by drawing a card from the pack, placing it behind the unit in question with initially a standard move needing at least a two to activate. Cards are best drawn for each unit in the command then so long as you don't fail going back to the lowest drawn card behind a unit in that command and attempting to beat it, i.e. a two is the first card, then you will need a three to initiate again and so on till you fail. Difficult moves (turning one hex point left or right or stepping back one hex) requires one card higher again so the three above would therefore need to be at least a four so that moving troops becomes increasingly difficult as you go on. If you fail to initiate a unit all movement ceases for that command and you move on to the next. When all commands have completed their moves/combats the cards are shuffled and the opposition have their turn.
Victory points are calculated to a formula and each side is given an appropriate number of tokens which they discard each time a unit is lost. Run out of tokens an loose the game.

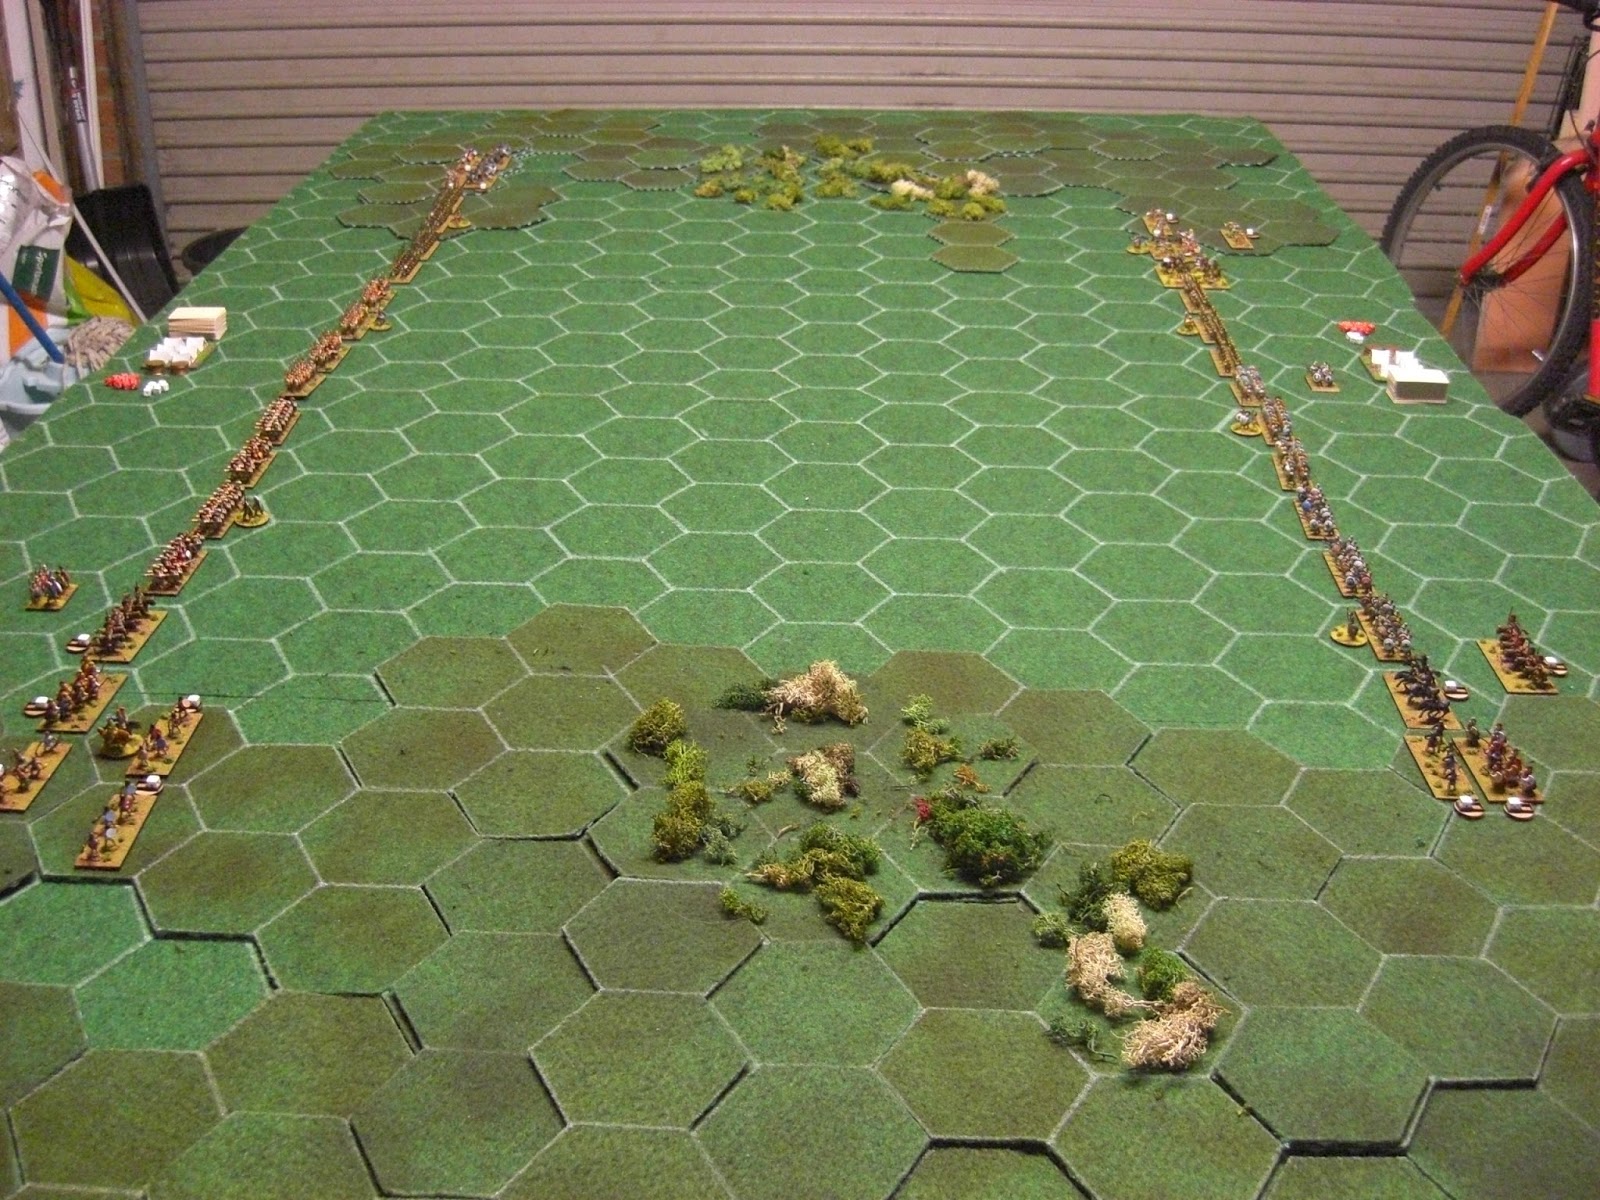
The initial set up with the Spartan alliance on the left (me) and Athenians (Neal) on the right. Hoplites in the centre lights on the flanks for both sides, in other words a classical setup. Lichen marks rough going, hills give height advantage and block line of sight.


1st move by me and the Theban tossers decide prudence is best and turn over an ace for their command, a two is the minimum required, troops move one extra hex while out of charge reach of enemy (not in rough terrain), there is a command radius of two hexes so be careful where you place your leaders.


This picture shows the cards behind the units on the Spartan left flank command, I wanted to activate the Skythian horse archers (centre of the picture) to enable them to fire on the hoplites to their front. As can be seen they drew a four on the first turn of the cards while the other units turned higher cards, I therefore attempted to activate them again as they would only have required at least a five to fire, unfortunately another four was pulled out meaning that that commands moves were at an end. The small dice donate the number of missile ammunition each unit has.


The Spartan lights on the opposite flank with cavalry pushed forward.


A general view of the action with both Neals Athenian flanks (lights with hoplite support) advancing and his centre holding back.


On the Athenian right the advancing hoplites find themselves isolated when the Thebans opposite finally surge forward but the fight is still very much in the balance as the Athenian light troops are pressing hard through the rough ground to their front with a cavalry unit even swinging wide round the Theban left flank. The red dice marks one casualty to the unit, two casualties and the unit is removed, though you can rally them off.


The flanking move.


On the opposite flank Neal's Athenian hoplites supported by their light troops smash into their lighter opponents driving them off the ridge they were defending and driving them back towards the Spartan encampment. This Spartan command was almost completely destroyed by this attack, but as we shall see the Athenian hoplites pursued their opponents too far and should have turned inwards to roll up the Spartan centre.


A general view of the field at this point shows the Athenian left victorious and their right holding it's own. It was in the centre however that the battle would be finally decided. Red casualty markers are starting to appear - even on my veteran Spartan hopilites (which was a bit worrying) but rallying them off the Spartans began to fight back.

 
Destroying one Spartan hoplite unit the Athenian hoplites are forced to advance into the vacant hex, the remaining Spartans now sit on the Athenian flanks thereby effectively attacking twice each (drawing two cards for a flanking attack).


End game, with his centre collapsing Neal's Athenians finally ran out of victory tokens. I pulled it out of the bag with only two remaining myself. If only the Athenian hoplites on their right had turned inwards - 'Oh dear, how sad, never mind'!


Oddly enough Simon Miller is doing a BATRAP of a similar 'To the Strongest' game he is playing at the moment. His blog and link to his ruleset can be found here. Do have a look it's a great blog and as stated the rules suit Neal and myself to a tee.
Thanks for looking.
Dave.

Saturday 11 July 2015

To The Strongest, 15mm Greek

Neal and I have been playtesting Simon Millers To The Strongest rules over the last month or so (find Simon's blog The Big Red Bat Cave Here) always up to now on the grid system he recommends. These rules are fantastic, and believe me I don't give such praise easily I am very choosy in the rules that I can be bothered to spend my time learning - I am one lazy sod that way!
After my construction of my hex table Here we decided to adapt the rules to hex based play, frankly they didn't need much adaptation. Simon says in his introduction to the ruleset that he disregarded the idea of using hexes for movement as he thought the hexes would allow too much manoeuvring for units in the ancient period which he was trying to avoid but we didn't find this at all. The units faced the point of the hex as can be seen here:


The units attack to the front two hexes, flank attacks to the side, rear attacks to the hexes to the back. If a unit wishes to change facing then this is classed as a difficult move and if successful the unit is moved to face the point of the hex to the left or right. The rules cover the all of the ancient period, Simon is I believe looking to extend up to the Thirty Years War and Neal and I will be playtesting Neal's adaptations at his place next week.
I won't go into the details of how the rules work but do have a look on Simon's blog http://bigredbat.blogspot.co.uk/ for how to play. As I say I couldn't recommend them more, each game is finely balanced and as I said in another comment on the rules elsewhere, at our Border Rievers Club swearing is compulsory but there is considerably more than usual when playing with this set of rules, all in the best possible taste of course.
Enough for now but I will post pictures of the full game in due course.
Dave.

Thursday 9 July 2015

Thursday 2 July 2015

What not to sell!

Just returned from a short break in Gran Canaria yesterday, a nice do sod all holiday with my wife. The hotel was fine with a large complement of German and Polish guests, not a problem, we both mix in well with anyone (but do note the nationalities here).
The island itself was to be frank pretty crap, few shop for her ladyship and not much to do, however we managed to find a shopping complex and being a good boy I trailed around in her wake. However, browsing round the usual tourist junk I spotted a display cabinet on the wall outside a shop with model soldiers inside, woo hoo. On closer inspection I could not quite believe what I saw:


Inside the shop was an even larger cabinet with dictators ranging from Attilla the Hun to Pol Pot, about sixty figures but in amongst them all were single figures of Pope John Paul II sitting in his chair and Jesus standing with arms wide!! (I would have loved to get a photo of this but even the picture of the outside cabinet was surreptitiously taken.)
Oh to have been a fly on the wall when the owner came to the decision of what exactly he was going to sell in his shop. 'Who are the main tourists who will be visiting the island? Germans yes? well I'm sure they'd go for figures of Hitler and all his mates, sure fire hit there eh.'
Unbelievable.
Dave.