Welcome

Welcome to my wargaming blog,
I'm Dave and live in Morpeth, Northumberland in the UK.
This may or may not be a regular thing, we'll just have to see how it goes.

I am a painter/collector of figures first and a wargamer second. My thrill in this great hobby of ours is to place that final well researched & painted unit into the cabinet. The actual gaming with the figures is an important but secondary experience, we all like to win, but it isn't the be all and end all of it, being with good friends and having fun is.
Hope you will enjoy reading this blog as much as I will writing in it.
Just to remind the visitor to scroll down the various pages and click on 'older posts' to see more.
Dave.
Showing posts with label 10mm Caesarian Roman. Show all posts

Thursday, 21 November 2024

10mm Ancient Germans

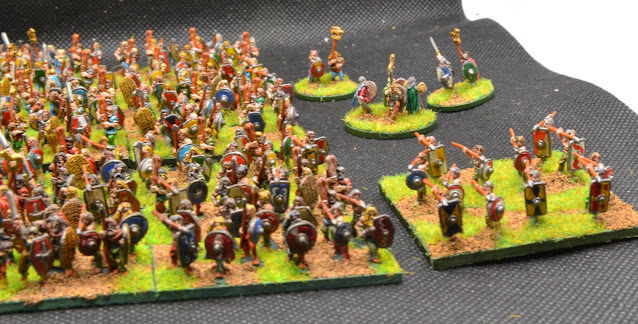
 I generally find painting any non-uniformed troops a struggle so wading my way through these lads did take a bit of time. There are enough to constitute a allied force within the Roman armies but I think I will have to paint up the same number again to fight them as a stand alone army. I have a few archer and cavalry units to add but they will  to wait a bit for my eyesight to recover!

All figures Steve Barber


Something less taxing next time.

Dave.

Monday, 13 May 2024

10mm Ancient Germans

 Just to show I'm still here, 10mm Ancient Germans, Pendraken figs. The beginning of some additional opposition, or allies of the Caesarian Romans.

Loads of the hairy buggers to do and painting non uniform troops is a pain but really nice figures from Pendraken.


I have made considerable progress with my WSS 10mm French infantry and will get round to getting them on here.

Dave.

Sunday, 9 January 2022

To The Strongest Caesarian 10mm

 Though I haven't for a while I do actually play a wargame occasionally, painting and collecting units/figures is my thing but it is still nice to sometimes give the lads a runout as it were!

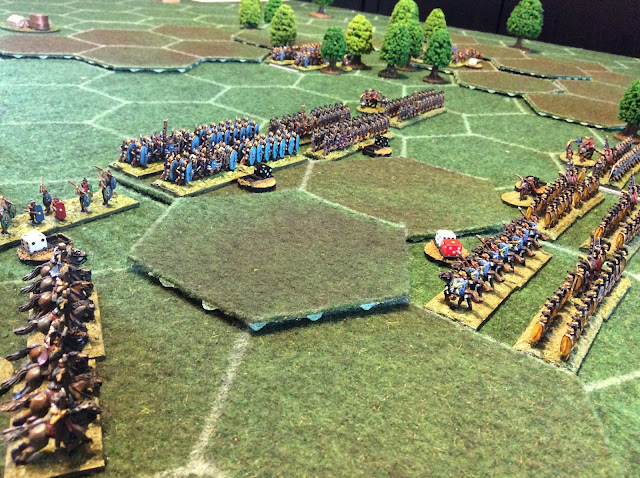
My Caesarian Roman chaps have not been on the table for a while so I dusted them off and set to with a civil war Caesar Vs Pompey bash on the hex table using the brilliant To the Strongest rules which are recommended to be played on a table marked out with squares but can I assure you be played very easily using hexes.

The two forces were set out, both balanced points wise, Pompay's force (yellow and white shields) having more skirmish troops plus three Heffalump's but with the yellow shield half legion being classed as raw (+7 save as a pose to +6 for the other legionaries). While Caesars force were standard legionary's plus three manuballista which I allowed to move as per infantry.

The field of battle, Pompay's force to the top of the picture, Ceasar's to the bottom. Note the white die behind units, missile troops have a number of shots allocated depending on their weapon, legionaries have one hit pip denoting the use of the pilum. Also the coins in the two camps show the moral of the armies, you lose an appropriate number of coins depending on the unit lost, run out of coins and your army breaks. 


Three elephant units, each one classed as large but prone to 'stampede'

Numidian cavalry

Pompay's raw legionaries

Pompay's right wing cavalry and skirmishers

Caesarian half legion and manuballista

Caesar's main legionary force with his cavalry reserve in the background.


White shield legionaries showing pilum die.

Left wing Pompeian cavalry close on the Gauls.

Pompay's right wing cavalry led by the man himself swing in a large arc around the Caesarian left flank.

Left wing Caesarian legionaries facing the advancing skirmishers.

Pompeian centre advances.

First casualties, the red die indicates a disordered unit.

The elephants get closer.

Caesar is forced to take his Gallic cavalry reserve to the left to counter the enemy cavalry.

Gallic javelin wound the Pompeian general.

Pressing the attack on the left.

Crunch time, two initial attacks by the elephants but if they suffer a casualty they test for rampage direction inflicting casualties on the way then dispersing.

The manuballista prove disappointingly ineffective.

Pompeian cavalry are slowly getting the upper hand.

After damaging the cohort to it's front the elephant rampages through the same unit but fails to destroy it and is removed from play.

Though the 'red' cohort sits on the flank of the advancing raw yellow Pompeian unit getting two free strikes it still somehow survives and fresh cohorts can be seen advancing to exploit the gap!

Legionaries advance into the woods, maybe not a great idea against skirmish troops.

Damage has been done to the Caesarian legionaries on the hill, can the Pompeian forces take advantage?

The Gallic cavalry is suffering, two units disordered, one lost and their wing general killed.

The gap is widening, raw legions or not they are fighting well.

This skirmish unit has manoeuvred it's way round the red legions flank and will kill their general next turn.

General lost, unit damaged and others having to take a moral check.

This Pompeian cohort has fought its way into the centre of Caesars line destroying on 'blue 'unit.

Caesars right flank is in danger of being turned.

The units behind (top left of the photo) are Caesarian casualties, it's not looking good for them.

The Caesarian centre is under pressure but holding. It's everywhere else that is in trouble.

The red legion disintegrates, the end is neigh.

Skirmishers keep the pressure on.

The missiles pore in.

At this point the Caesarian forces loose a unit and run out of coins thereby prompting the disintegration of their army. An excellent battle and credit to the yellow raw half legion crushed their opponents and exploited their success.

Nice to get these figures out again, hope you enjoyed the AAR.
Dave.

Saturday, 20 May 2017

10mm Numidian Elephants et al.

As the ongoing Roman civil war campaign may at some point drift into African provinces I thought that I had better get my act together and paint up some appropriate 10mm figures:


Numidian cavalry, Old Glory.


Numidian Elephants, Magister Militum.


Roman Ballista, Magister Militum.


Finally, look what arrived this morning. I think we all know what the next post will be about!
Dave.

Friday, 5 May 2017

Caesar Vs Pompey campaign. Battle of Neapolis 49BC

The end of the campaigning season of 49BC was fast approaching, Caesar knew that the Italian peninsular had to be secured following his victory over Pompey at the battle of Rome and though disturbing news had reached him of the Pompeian victory at the battle of Narbo (see previous posts) Caesar had to force Pompey out of Italy and overawe the senate in Rome. Pompey could then be dealt with the following year while Mark Anthony restored the situation in Iberia.
Pompey the Great however understood well that he alone stood as the rock upon which Republican Rome could cling to during this time of crisis, he and as many of remaining force must withdraw to the east in order to regroup and subsequently return to save Rome from the tyrant.


Leaving Mark Anthony to secure Rome and of course make the remaining senators see the error of their ways, Caesar's four strong legions advanced rapidly from Rome to Neapolis (Naples) catching Pompey before he could withdraw.


The campaign blocks used in the encounter before being transferred to the table top. As usual the strength points at the top of the block are the ones used, one SP = one unit on the table with the named commanders able to choose Legion, cavalry or skirmish units from their strength points. Remember Pompey still holds the defecting Caesarian cavalry unit.


Starting positions, Pompey (on the right) had to begin the battle three quarters of the way up the table, this replicates the campaign battle rule that at least one round of combat must be fought before one of the two forces have the option of withdrawing from the battle. This gives Caesar (on the left) a reasonable chance to inflict casualties or destroy Pompey before he can get off the table. The huge difference between the two forces can be seen in this picture.


View from the Caesarian side.


View from the Pompeian side.


The pictures above show Caesar utilising his advantage in numbers pushing both his wings forward in order to outflank his opponent. Pompey slowly withdraws pushing his cavalry out to the right. In the To the Strongest rules withdrawing backwards is classed as a difficult move so the right cards must be turned in order to allow this to happen - tense stuff!


These photos show the situation at the end of each turn so the Caesarian forces get close enough to throw pilum, and get the odd hit in but cannot get the right card to land a heavy punch onto their opponents, Pompey skillfully pulls his troops back just in time.


Finally Caesar gets his legions close enough, the cards turn, hit and counter hit and the Pompeian legion routs one of their opposite number. Fortunately the rout does not spread.


Damage has been inflicted on both sides but Pompey's camp (and the withdrawal point) is in sight.


The dotted line in the top picture shows the withdrawal line. Pompey's has pulled off a very skillful withdrawal in front of superior enemy forces and has escaped with his army intact. Caesar must reflect on a missed opportunity.
A very enjoyable game even though the forces never really got stuck in. This was Pompey's objective of course and the cards as appose to dice favoured him immensely, given better luck Caesar should have given him a good pasting but it was not to be.


The campaign map at the end of 49BC with both sides going into winter quarters. Pompey's forces though weak in numbers hold all of the Iberian peninsula and though Pompey himself has been driven out of Italy his forces continue to hold Sicily and he will gather men from the east to fight on in Greece. Caesar holds Rome and once secure will push on eastwards. A counter punch by Mark Anthony must take Hispania.
I may take a small break here in order to clear the table and have a couple of other games of different periods but this will continue as I'm enjoying it too much to stop!
Dave.